


Step 2
Working with youe blog
1 Create a blog
To start a blog with Blogger, visit the Blogger homepage, enter your username and password, and click Sign in. Enter a display name and accept Blogger's Terms of Service. Then click the Create a Blog link and get started!Pick an address (URL) and a blog title. Then, choose your favorite blog template (this is how your blog will look when you publish it). Now get creative, add information to your personal profile, and customize how your blog looks, if you feel up to it. Start blogging now!
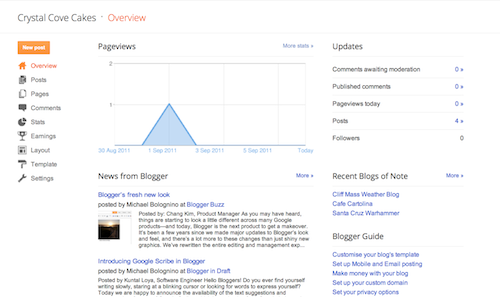
Dashboard
- Writing a new post: Just click on the orange Pencil icon on your Dashboard to access the Post Editor.
- Viewing your posts: The gray Post List icon will take you to a list of your published and drafted posts for a specific blog.
- Catching up on your favorite blogs: Below the list of your own blogs, you’ll see a list of the blogs you follow with an excerpt from their latest posts.
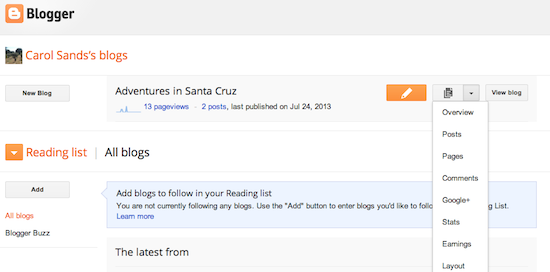
- Everything else: Check out the drop-down menu next to the Post List icon for a quick link to:
- Overview
- Posts
- Pages
- Comments
- Stats
- Earnings
- Layout
- Template
- Settings
Overview
Write your post
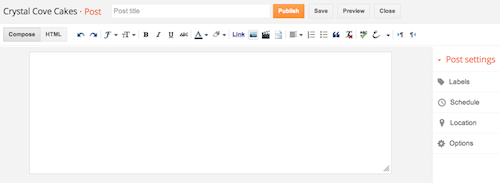
Once you've signed in to Blogger, you'll see your dashboard with your list of blogs. Here's what you need to do:- Click the orange pencil icon to write a new post, and enter anything you want to share with the world.
-
Next, you'll see the Post Editor page. Start by giving your post a title (optional), then enter the post itself:
-
When you're done, click the Preview button at the top to make sure it's ready to go, and then click the Publish button to publish your post.
Add an image
You can add an image from your computer or the Web to your blog. Click the image icon in the Post Editor toolbar. A window appears prompting you to browse for an image file on your computer, or enter the URL of an image on the Web.Once you've selected your image, you can then choose a layout to determine how your image will appear in your post:
- The 'Left', 'Center', and 'Right' options allow you to customize the way your blog text will flow around your image.
- The 'Image size' options will determine how large the image will appear within your post.
You can also publish images to your blog using your mobile device, Google's free photo software Picasa, or a third-party service like flickr.
Add a video
To add a video to your blog post, click the film strip icon in the Post Editor toolbar above where you compose your blog text. A window appears prompting you to 'Add a video to your blog post.'Click Browse to select the video file from your computer that you'd like to upload. Note that Blogger accepts AVI, MPEG, QuickTime, Real and Windows Media files and that your video must be less than 100MB in size.
Before uploading your video, add a title in the 'Video Title' box and agree to the Terms and Conditions (you'll only have to do this the first time that you upload a video with Blogger). Then click UPLOAD VIDEO.
While your video uploads, you'll see a placeholder in the post editor showing where your video will appear. You'll also see a status message below the post editor letting you know that your upload is in progress. Depending on the size of your video, this usually takes about five minutes. When it is complete, your video will appear in the post editor.
Customize
Your template is a fun way to customize your blog. When creating a new blog, you're first asked to choose a default template, this is the basic design of your blog. You can choose from many templates for your blog; simply pick the one that best fits your needs.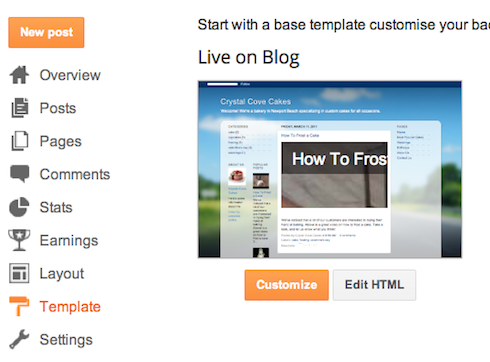
Once on the Template tab, you can either click on the orange Customize
button to get started with our easy-to-use WYSIWYG (“What you see is
what you get”) template designer, or choose one of our many default
templates. If you’d like to edit the HTML of your blog, just click the
gray Edit HTML button.
In addition, you can customize your blog's design using our intuitive drag-and-drop interface. You can also add powerful gadgets such as slideshows, user polls, or even AdSense ads.
If you want more precise control over your blog's layout, you can also
use the Edit HTML feature. To edit your blog's layout, follow these
steps:
- Click Layout from the drop-down menu on your dashboard below the blog you would like to customize.
- From there, click Edit to edit existing gadgets, or Add a Gadget to add new ones.
- To add a new gadget after you've clicked Add a Gadget, simply click the plus sign next to your desired gadget. You can choose from gadgets by category, or search for a specific gadget in the top right of the pop-up window.
- Once you've added the necessary information to your selected gadget, click the orange Save arrangement button. Your layout changes will appear instantly.
Privacy and permissions
By default, your blog is completely public, and can be read by anyone on the internet. However, if you want to keep it private, you can do that, too. You can change these settings on the Settings | Basic tab.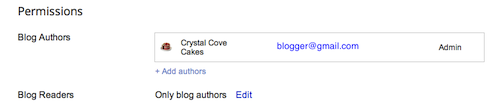
- Under the 'Blog Readers' section, you'll probably see 'Anybody' selected as the default. When you change this to 'Only these readers,' you'll get an Add Readers button.
- Click the Add Readers button and then enter the email address of a person to whom you'd like to grant access to your blog. To add multiple people, separate their addresses with commas.
- For each address entered, the Google Account associated with that
address will be given access to view your blog. If an address is not
associated with an account, that person will receive an invitation email
with a link allowing them do one of three things:
- Sign in to an existing account.
- Create a new account.
- View your blog as a guest (no account required).
2 Blogger Template Designer
Blogger Template Designer
is a new way for you to easily customize the look of your blog. You can
select a variety of templates, images, colors, and column layouts to
make your blog an expression of you. To get to the Template Designer,
just click on the drop-down menu of the gray Post List icon, and select Template. From there, you'll be able to choose and customize your template.
As you play around with the Template Designer, you’ll see a preview of how the blog will appear based on the choices you’ve made, which you can expand to by pressing the toggle to Expand Preview between the Blogger Template Designer dashboard and the preview. When you’re satisfied with the look of your blog, you can make them go live by pressing Apply to Blog in the top right hand corner of the Template Designer.
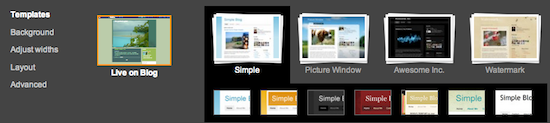
To get started with Blogger Template Designer, select a template for your blog from one of the professionally designed templates that are available. Each template appears as a large thumbnail that when clicked will show different variations on the template below that you can select by clicking on them. Note that clicking a new template will erase any customizations you’ve made on a previous template.
Once you’ve chosen a template, you can continue customizing the look of your blog.
 No matter what template you are previewing in Template Designer, you
can always see what is currently live on your blog by looking at the Live on Blog
thumbnail in the Template Designer control panel. You can also click on
it to reset the template in the Template Designer to the live version
of your blog.
No matter what template you are previewing in Template Designer, you
can always see what is currently live on your blog by looking at the Live on Blog
thumbnail in the Template Designer control panel. You can also click on
it to reset the template in the Template Designer to the live version
of your blog.

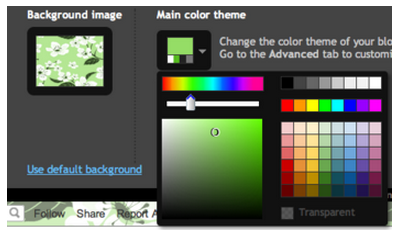
One of the best new features of Template Designer is the ability to change the color of your background image. This is possible when a background image has transparency. You can tell that a background image is transparent because it has a checkerboard in the top right hand corner of the image.
Once you’ve selected your image, you can change the color of the background by clicking on Main Color Theme and then selecting the color of your choice.
Note: If background image is not transparent, themes will alter the text color scheme of the blog
 If you want to add or remove gadgets or edit gadget settings, you
cannot do this through Blogger Template Designer. Rather, you have to do
this on the general Layout tab.
If you want to add or remove gadgets or edit gadget settings, you
cannot do this through Blogger Template Designer. Rather, you have to do
this on the general Layout tab.
As you play around with the Template Designer, you’ll see a preview of how the blog will appear based on the choices you’ve made, which you can expand to by pressing the toggle to Expand Preview between the Blogger Template Designer dashboard and the preview. When you’re satisfied with the look of your blog, you can make them go live by pressing Apply to Blog in the top right hand corner of the Template Designer.
To get started with Blogger Template Designer, select a template for your blog from one of the professionally designed templates that are available. Each template appears as a large thumbnail that when clicked will show different variations on the template below that you can select by clicking on them. Note that clicking a new template will erase any customizations you’ve made on a previous template.
Once you’ve chosen a template, you can continue customizing the look of your blog.
Background
Even though you’ve chosen a template, you can still change the way that it looks. Using Blogger Template Designer, you can choose the background color or image for your blog and then play with the color scheme. To start customizing your background, click on the thumbnail under Background Image.One of the best new features of Template Designer is the ability to change the color of your background image. This is possible when a background image has transparency. You can tell that a background image is transparent because it has a checkerboard in the top right hand corner of the image.
Once you’ve selected your image, you can change the color of the background by clicking on Main Color Theme and then selecting the color of your choice.
You can only change the color of your background if the background is
transparent. Also, if the template that you chose has a grey
background, you cannot change its color.
In addition to selecting and personalizing your blog’s background
image, you can also choose a color theme to apply to aspects of your
blog, including text and links. You can do this by playing with the Main Color Theme or by choosing one of our Suggested Themes. Changing the color theme of your blog will change the colors for all aspects of the blog template that can be changed.Note: If background image is not transparent, themes will alter the text color scheme of the blog
For information on uploading your own custom background image, please see our article on adding custom CSS to your blog.
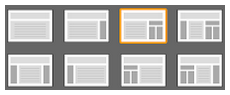
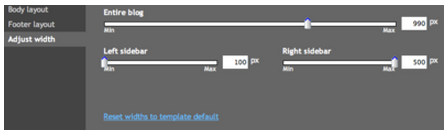
Layout
You can choose a variety of layout options for your blog, from one to three columns. These layouts feature drag and drop functionality for gadgets. You will also have a variety of layout options for the blog footer as well.Adjust Width
You can change the width of the blog, and the right and left columns by dragging the slider for the different parts of blog layout. Note that the options you see here correspond to the type of layout that you chose. If, for example, you chose a blog with left and right columns, you will see both left and right column sliders. If, however, you chose a blog with only a left column, you will only see that option here.3 About Blogger profiles
This article is about your Blogger profile. You can also use your Google+ profile with your blogs.
Think of your profile as an easy way to create an "About Me" page
supplemental to your blog. You can describe yourself, share your
interests, include a photograph of yourself, and change your display
name. Your interests, favorites, and other items act as links to other
people whose profiles share the same things. Others can access your
profile by clicking on your Blogger display name (i.e., when you leave a
comment with your display name, or end your posts with "Posted by
[display name]"), your profile widget, or by discovering your profile
through shared interests.To change your profile information, click the drop-down menu next to your username on the top-right corner of your dashboard.
To display your profile gadget on a particular blog:
- Go to Layout
- Click Add a gadget
- Scroll down and select Profile
4 Compatible browser and operating systems
To use Blogger, your browser must allow cookies and have JavaScript turned on.
Older browsers might work with Blogger. But we can't guarantee that all of the Blogger features will work perfectly. For best results, make sure that you're using the latest version of your browser.
* For best results, turn off Compatibility View.
Compatible browsers and operating systems
Blogger works with the following browsers and operating systems:| Windows XP/7 | Linux (Ubuntu) | MAC OSX 10.4 + | Mac OSX 10.3.9 and below | Windows 8/8.1 | |
|---|---|---|---|---|---|
| Google Chrome | ✓ | ✓ | ✓ | ✓ | ✓ |
| Safari 4 + | ✓ | ✓ | |||
| Internet Explorer 9* | ✓ | ✓ | |||
| Internet Explorer 10* | ✓ | ✓ | |||
| Firefox 3.6 + | ✓ | ✓ | ✓ | ✓ |
Older browsers might work with Blogger. But we can't guarantee that all of the Blogger features will work perfectly. For best results, make sure that you're using the latest version of your browser.
* For best results, turn off Compatibility View.
5 Create and change URLs
A URL is the address of a website. For example, www.google.com is a URL.
Create your URL
When you create a blog, you'll choose a URL. Visitors can access your blog by typing the URL you've chosen into the address bar of their browsers. Here are a few things to know:- The format for your URL will be
nameyouchoose.blogspot.com. - When you choose your URL, remember that you can use only letters, numbers, and hyphens. Special characters like $, #, &, etc. won't work.
- Since there are already a large number of Blogspot blogs, you may need to get creative and possibly try a few different URLs before you find one that's available.
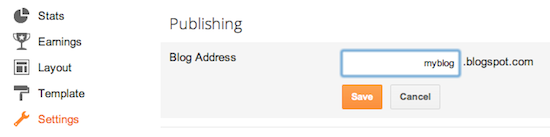
Change your URL
Here are a couple of things to know about changing your URL:- If you change your blog's URL, your old URL will be available for other bloggers to use.
- If you don't want your URL to include "blogspot.com," go to custom domain.
- Sign in to blogger.com.
- Under Settings on the left, click Basic.
- Edit your URL in the Blog Address box.
- Click Save.
6 About the Navbar
The Blogger Navbar appears by default at the top of every Blogger-powered blog, unless you're using Dynamic Views.


 Notes:
Navbar features include:
- [B]: Takes you back to
www.blogger.com. - Search box: Searches the blog you're viewing. Results will appear directly on the page.
- G+ share button: Lets you share the blog to your circles on Google+.
- More: This drop-down lets you share the blog by email or on other social websites as well as notify our team of a Terms of Service violation by clicking "Report Abuse." You can also report abuse through our Help Center.
- Next Blog: Takes you to a recently-updated Blogger blog similar to the one you're currently viewing.
- [email address]: If you're signed in to your account, you'll see your own address here. Other viewers will see their own email addresses, or none at all if they aren't signed in.
- New Post and Design: If you're signed in, these links will take you to your Blogger Dashboard.
- Sign In/Out: This displays the appropriate option, depending on whether you're signed in or not.
- We've made every effort to make sure the Navbar doesn't interfere
with custom template designs. However, some display problems may occur.
Here are a few things to try if you are running into trouble:
• add
style="margin-top:40px;"to the topmost element of your Template. (i.e.<table>would become<table style="margin-top:40px;">)
• make sure the closing</head>tag is present; it should go before the<body>tag.
Posting & Editing
- Delete a blog post
- Link to other websites
- How are line breaks treated?
- About post templates
- Find an old post
- Compatible browser and operating systems
- Limits on Blogger
- How do I use the transliteration feature?
- Blogger's post editor
- Schedule posts
- Edit posts
- Create 'After the jump' summaries
- Create a new page on your blog
- Draft a post
- Blogger Mobile
- Quick Edit links
- Why do I have word verification on my posting form?
Create a New Blog on Google BloggerVideo
Resource https://www.youtube.com/watch?v=hnIdotClgXY
Resource https://support.google.com


Resource https://support.google.com
!!! UPDATE !!!
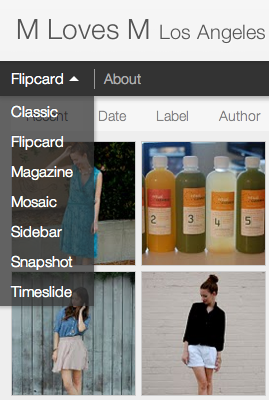
7 Dynamic Views
Blogger now offers seven new ways to experience your favorite blogs.
- Classic: A modern twist on a traditional template
- Flipcard: Photos tiled across the page
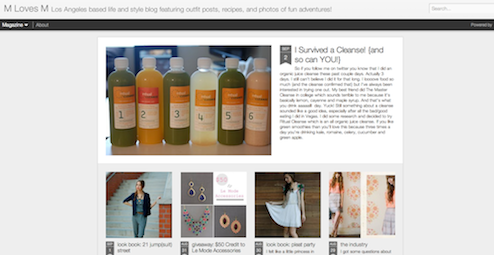
- Magazine: A clean, elegant editorial style layout
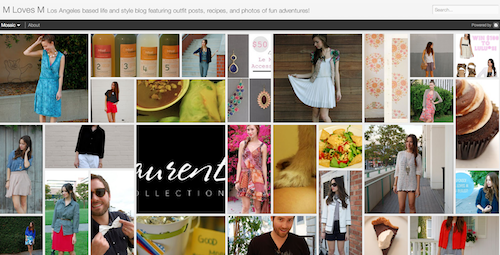
- Mosaic: A mosaic mix of different sized images and text
- Sidebar: An email inbox-like view with a reading page for quick scrolling and browsing
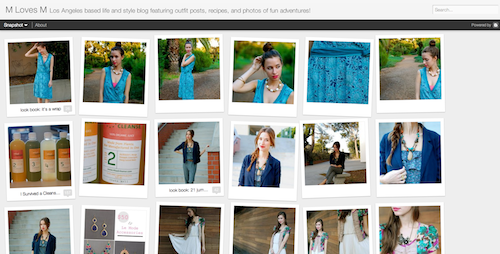
- Snapshot: An interactive pinboard of your posts
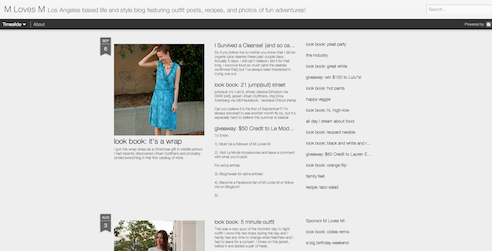
- Timeslide: A horizontal view of your posts by time period
Dynamic Views make it easier to read your favorite blogs. Better yet, they make it easy to discover posts written long ago that you may not have read.
Blog authors can now configure their blog to display Dynamic Views, and select a default view that best displays the type of posts on their blog. To experience a blog in view other than the default, you can simply select another view style from the toolbar, which, in some views, collapses into a thin line as you scroll. For the toolbar to reappear, simply hover your mouse over the line.
If the blog you’re reading has Pages enabled, the options will appear in a drop-down menu like the one in the image below.
If the author uses a traditional Blogger template, you can still explore the blog using Dynamic Views by adding “/view/” and then the view name to the URL. For example, to view buzz.blogger.com in the Mosaic view, simply change the URL in the address bar to buzz.blogger.com/view/mosaic.
Since Dynamic Views uses the latest software technology, they require the latest version of the most popular browsers, such as Internet Explorer 8+, Firefox 3.5+, Chrome or Safari. In all views, search is available in the upper right hand corner.
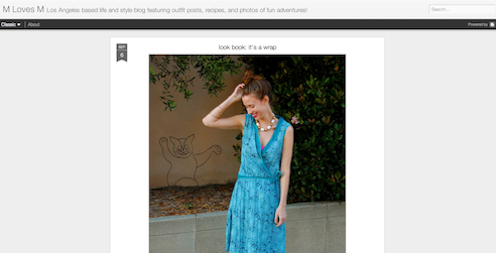
Classic
- Infinite scrolling replaces the “Older posts” link.
- Use keyboard shortcuts to quickly jump between posts. You can navigate through the posts using J (older post) and K (newer post) or the arrow keys.
- Posts will continue to load as you scroll.
Flipcard
- Run your mouse over any of the cards to see the post title and comment count. As you scroll down, additional posts will continue to load.
- Click on a card to see the post in full view. You can navigate through the posts using J (older post) and K (newer post) or the arrow keys.
- Hit escape or click Back to all posts to return to the Flipcard view. In the upper left, click to sort by Recent, Date,Author and Category.
Magazine
- Run your mouse over the top (most recent) blog to show highlighting and comments bubble animation.
- Select “X” to close and return to the default view.
Mosaic
- Clicking on an individual tile will expand that post to the full width of the view, and clicking again will collapse the post back into its original position.
- The exact position of the tiles is randomly determined each time the blog loads, but they will appear chronologically from top left to bottom right.
- Once a tile is expanded, you can page down by using the "up" and "down" arrow keys as well as J and K.
- This view is optimized for the tablet viewing, and supports screen rotation.
Sidebar
- Left sidebar is list of chronological posts, with comment counts and thumbnails for individual posts.
- J and K arrow keys will navigate through the posts.
Snapshot
- This view will display only the posts which have images.
- Clicking through any photo will display the full post page, with navigation links at the bottom for Newer and Older posts.
- Run your mouse over any photo to display a post snippet.
Timeslide
- This view breaks the blog content down into three different areas:
- Left column: Enlarged picture with a post snippet, title, and snipppet displayed in chronological order
- Middle column: Displays just the post title and snippet
- Right column: Displays just the individual post titles

NEW !!! You can actively participate in the wordpress911 team to ask and answer questions to upload articles and videos register » Here
Links: You can download the best WordPress Woocommerce templates HERE